
The Post Editor
This is your reference for the editor itself: the modes, the toolbar, the play-by-post-specific blocks, drafts, and attachments. If you're after the bigger picture of posting in general (Quick Reply versus Full Editor, IC and OOC, the character selectors), Forums, Topics, and Posting is your orientation. This guide is all about what you can actually put inside a post.
Editor modes
Myth-Weavers ships with three editor modes, and you can switch between them on any given post:
- Rich Text (default, recommended) — A WYSIWYG editor with toolbar buttons for formatting, images, tables, and the PBP-specific blocks (OOC, spoilers, whispers, fieldsets). Best for most writing.
- Markdown — Standard Markdown syntax with a live preview pane. Comfortable if you've been writing for GitHub, Reddit, or Discord for years.
- HTML — Raw HTML, for when you want full control over the markup. Sanitized on submit.
Legacy BBCode posts carried over from the old site still render perfectly, and you're free to keep writing in BBCode if that's where you feel at home. It just isn't one of the three default mode toggles. See The Post Editor for the full BBCode reference.
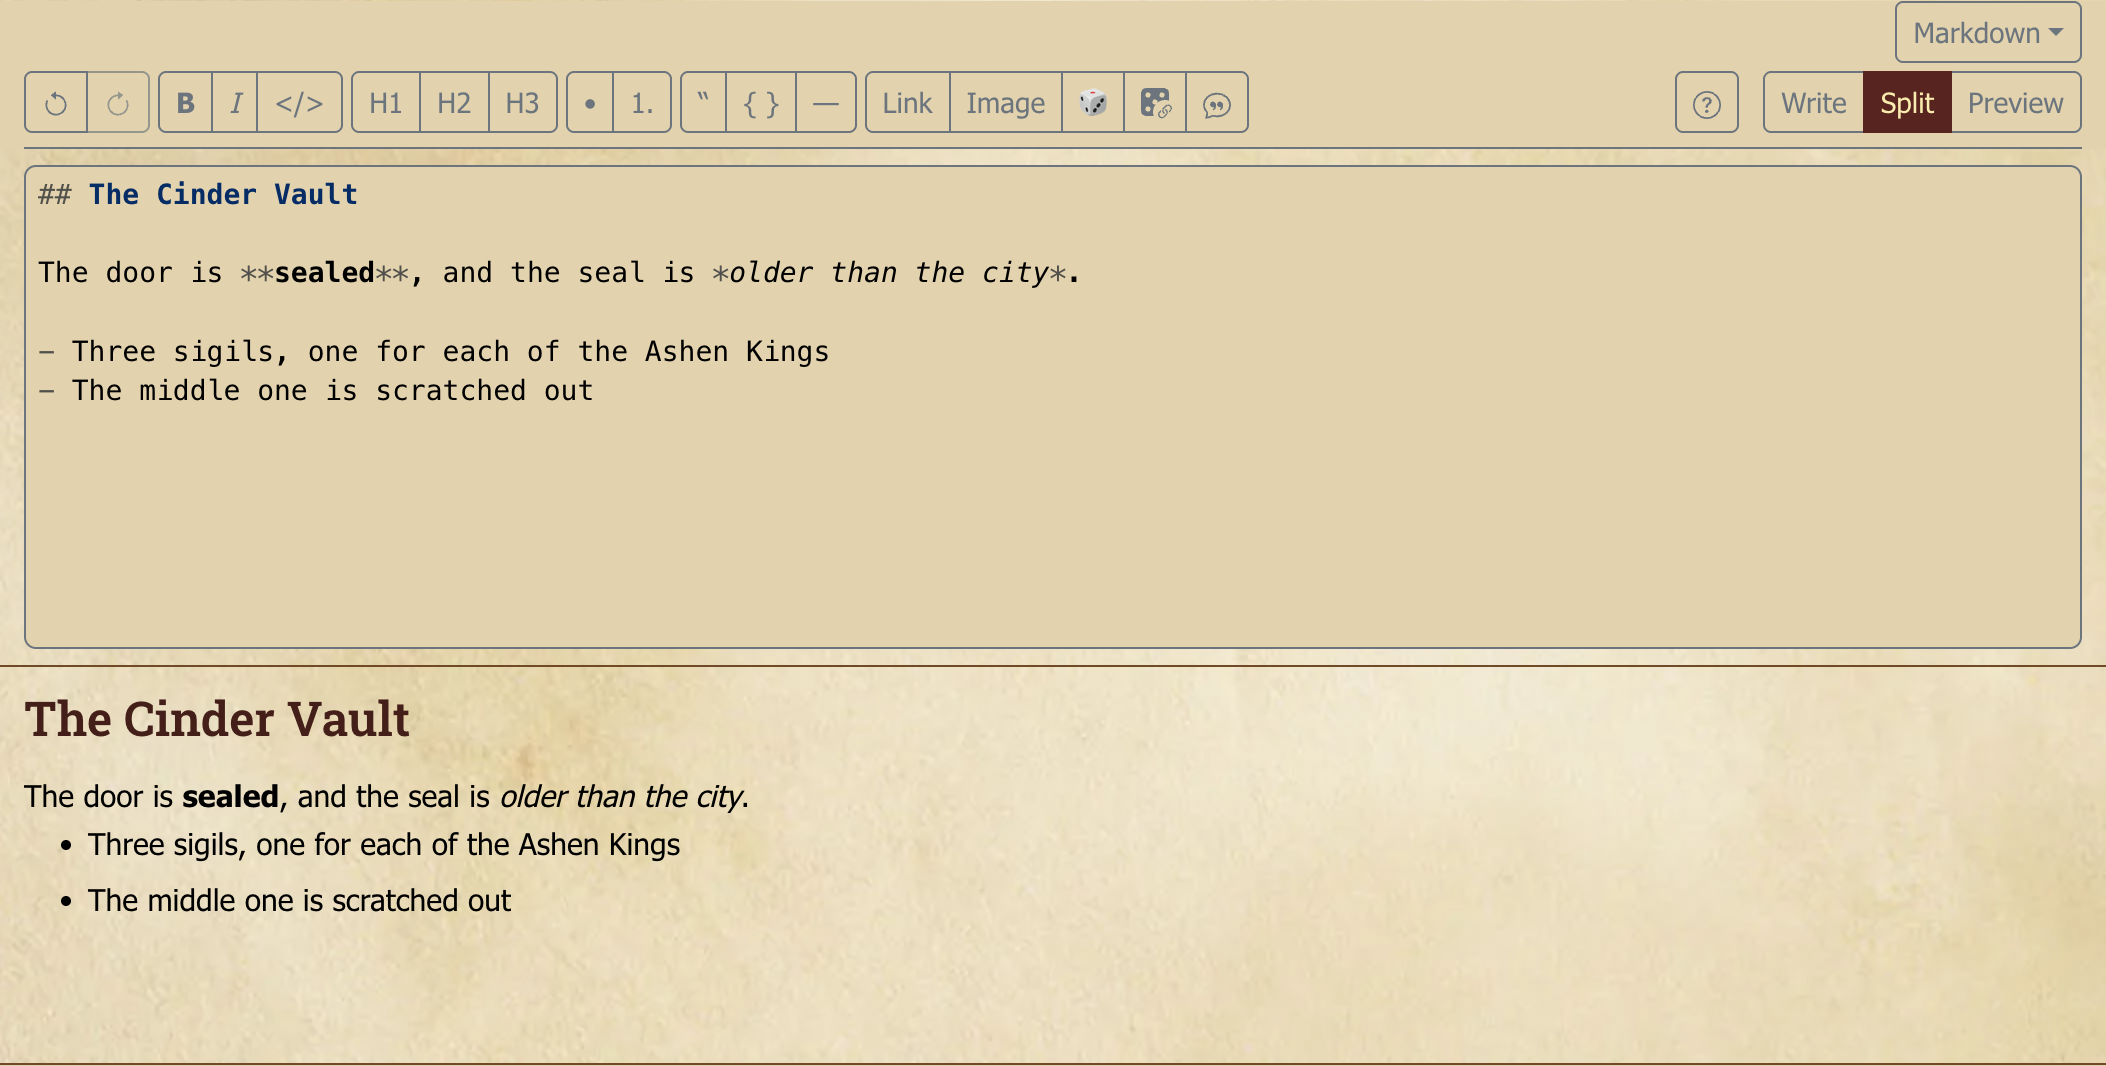
Markdown, HTML and BBCode all write markup by hand, and all three share one editing surface: syntax highlighting that follows your theme, undo/redo buttons, and a Write/Split/Preview toggle. See Writing in source for the details.
In Account Settings > Editor each mode has three settings:
- Default: the mode every new post, reply, and edit opens in. Exactly one mode holds this spot at a time.
- Available: kept in the editor's mode switcher so you can flip to it on a per-post basis, even though it isn't your default.
- Hidden: taken out of the mode switcher altogether. Set the modes you never touch (Markdown and BBCode, say) to Hidden and your toolbar gets that much tidier.
You can't hide your default mode, and hiding a mode never touches your existing posts. Editing a post always offers up whatever mode it was written in, so you can still open and tweak an old BBCode or Markdown post even when that mode is hidden from the switcher.
Quick Reply
Also tucked into Account Settings > Editor is "Open the Quick Reply box automatically when a topic loads." It's on by default, so the Quick Reply box at the bottom of a topic sits open and ready for you. Turn it off if you'd rather it start collapsed, in which case it expands when you click its header or when you quote a post. That keeps long topics from pushing the reply box way down the page. Either way, expanding a collapsed box drops your cursor straight into the editor, ready to write.
Mode-switch warning
Switching a post between modes can shift some of its formatting. The clearest example is going from HTML to Rich Text, which drops any markup the visual editor can't represent. So by default, switching pops up a confirmation that spells out what might be affected. If you switch modes constantly and don't need the nudge, tick "Don't show this again" in that confirmation, or flip "Don't warn me before switching editor modes" over in Account Settings > Editor. Switches will then happen instantly, and you can bring the warning back anytime from that same setting.
Rich Text (TipTap)
The Rich Text editor's toolbar gives you one-click access to:
Standard text formatting
- Bold, italic, underline, strikethrough
- Headings (H1 through H6)
- Bullet and numbered lists
- Links (insert, edit, remove)
- Block quotes
- Code blocks (syntax-highlighted)
- Horizontal rules
- Text alignment (left, center, right)
PBP-specific blocks
- OOC blocks — inline out-of-character content within an IC post (see Forums and Posting)
- Spoilers — click-to-reveal regions
- Whispers and Private blocks — Limited-read content (see Forums and Posting)
- Fieldsets — labeled bordered sections for stat blocks, letters, journal entries, and anything you want visually set apart
- Language tags — text spoken in a specific in-game language; comprehension is sheet-driven (covered below)
- Page links —
[[Page Title]]syntax linking directly to wiki pages - Sheet field placeholders — live values from a character sheet (covered below)
- Style guide — quick reference for the site formatting conventions

Moving and removing a block
Spoilers, fieldsets, private blocks, quotes and floats are single units, not just styled text, so they carry their own controls rather than being edited away character by character. All five work the same way.
Hover one and two controls appear at its top corners: a ☰ handle on the left, and a × on the right.
- Move it — drag the handle to a new spot in the post.
- Select the whole thing — click the handle. The block gets an outline, and copy or cut then applies to all of it — a spoiler's label and hidden text together, a fieldset's legend and body together.
- Remove it — click the ×. The block and everything inside it go; the text around it is untouched.
The private block puts its × in its header bar, next to Edit, rather than in the corner — that bar is always on screen, so the control is too.
On a phone or tablet there is no hover, so the controls are always visible and sized for a fingertip. Reach for the × rather than backspace: on some Android keyboards a selected block ignores backspace entirely.
Writing in source: Markdown, HTML and BBCode
Markdown, HTML and BBCode are all source modes: you write the markup yourself and a preview shows you the result. All three share the same editing surface, so whichever you pick you get:
- Syntax highlighting. Headings, tags, links, quotes and code are coloured as you type, and the markup characters themselves (
#,>,[b],<div>) are dimmed so your actual words stand out. The colours follow whichever site theme you're using, light or dark. - Undo and redo — the ↺ and ↻ buttons at the left of the toolbar, or Ctrl+Z / Cmd+Z and Ctrl+Shift+Z / Cmd+Shift+Z. These cover everything, including toolbar insertions: click Bold by mistake and one undo takes it back. The buttons grey out when there's nothing left to undo or redo.
- Bracket matching in HTML and BBCode. Put your cursor next to a
<or[and its partner is highlighted, which makes an unclosed tag much easier to spot. - Write / Split / Preview buttons above the editor. Write is source only, Preview is the rendered result only, and Split stacks the source above a live preview. Your choice is remembered.
- A toolbar that keeps your selection. Select a word, click Bold, then click Italic, and you get both — the word stays selected inside each new pair of markers instead of the cursor jumping to the end.
The editor deliberately does not rewrite what you type. It won't auto-close a tag, auto-continue a list when you press Enter, or turn a pasted link into link markup. What you type is what gets saved.
Markdown
Standard Markdown with a live preview pane. It's the same syntax you've already been writing for GitHub or Reddit, with the PBP blocks reachable through fence syntax.
HTML
Raw HTML, sanitized on submit. Use for fine control over markup that the other modes don't expose cleanly. Anything risky (scripts, event handlers, certain attributes) is stripped server-side.
Two extras here beyond the shared source-editor features above:
- Format tidies the whole document — consistent indentation and one tag per line. Also on Opt/Alt+Shift+F.
- Cmd/Ctrl+Shift+A selects the element your cursor is inside, brackets and all. Press it again to step out to the enclosing element, and again to keep going — handy for grabbing a whole
<div>to move or delete.
In Split view the preview is also a navigation aid: click any element in the rendered pane and the cursor jumps to that element's place in the source.
For the exact, complete list of what's kept versus stripped, every tag, attribute, inline-style property (with its accepted values), CSS class, and URL scheme, see the Allowed Content Reference, also linked from the editor's HTML Reference panel.
Editing posts brought over from the old site
Posts imported from the old forum are stored as HTML, so when you edit one it may open in HTML source mode even if you originally wrote it in a visual editor. You don't have to work in HTML:
- Most imported posts open straight in Rich Text. When the editor can represent the post's formatting cleanly, it opens it in the visual editor automatically — nothing to do.
- For the rest, you'll see a prompt — "Open this post in the visual editor?" — listing any formatting that might need a small touch-up. Choose Open in visual editor to switch, or Keep as HTML to stay in source mode. Either way, the choice sticks: once you've decided (or saved the post), you won't be asked again.
BBCode (legacy)
Posts written on the old site in BBCode render correctly. You can still write BBCode if you prefer. The editor still recognizes the legacy [b]bold[/b] and similar tags! New posts default to the modern-mode syntax, but long-time BBCode authors are still able to use what they're used to.
BBCode gets the same editing surface as the other source modes — highlighting, undo/redo and bracket matching, described above — plus a warning below the editor when a tag is left unclosed or doesn't balance. That warning waits until you pause typing, so it won't flash at you halfway through a tag. Content inside [code] and [noparse] is shown as plain text, matching the fact that the renderer doesn't parse tags in there either.
Under the hood: full mwbbcode tag reference
The editor recognizes the following BBCode tags (collectively, the "mwbbcode" dialect).
Text formatting
| Tag | Effect |
|---|---|
[b]…[/b] |
bold |
[i]…[/i] |
italic |
[u]…[/u] |
underline |
[strike]…[/strike] |
strikethrough |
[sub]…[/sub] |
subscript |
[sup]…[/sup] |
superscript |
[color=hex|name]…[/color] |
color (e.g. [color=#a00] or [color=red]) |
[size=1-7]…[/size] |
font size |
[font=family]…[/font] |
font family |
[highlight]…[/highlight] |
highlighted text |
Links and media
| Tag | Effect |
|---|---|
[url=https://…]label[/url] |
link with label |
[img]url[/img] |
inline image |
[mention]username[/mention] |
@mention |
[page]Page Title[/page] |
link to a wiki Page |
Lists
| Tag | Effect |
|---|---|
[list]…[/list] |
bulleted list (use [*] for items) |
[list=1]…[/list] |
numbered list |
[list=a]…[/list] |
lettered list |
[*] |
list item |
Block content
| Tag | Effect |
|---|---|
[quote=author]…[/quote] |
block quote with attribution |
[code]…[/code] |
code block |
[spoiler=label]…[/spoiler] |
click-to-reveal spoiler |
[fieldset=title]…[/fieldset] |
labeled bordered section |
[ooc=label]…[/ooc] |
out-of-character inline content |
[private=recipients]…[/private] |
private block (allow-list audience) |
[h1]…[/h1] through [h6]…[/h6] |
headings |
[hr] |
horizontal rule |
Layout
| Tag | Effect |
|---|---|
[left]…[/left] |
left-align |
[center]…[/center] |
center-align |
[right]…[/right] |
right-align |
[indent]…[/indent] |
indent block |
[floatleft]…[/floatleft] |
float content left |
[floatright]…[/floatright] |
float content right |
Special
| Tag | Effect |
|---|---|
[noparse]…[/noparse] |
render tags inside literally (escape hatch) |
[table][r=col,row]…[/r][/table] |
tabular layout |
[inlinedice]…[/inlinedice] |
inline dice reference |
[sheetfield]…[/sheetfield] |
character sheet field placeholder |
If a tag isn't in this list, it's not recognized — write it inside [noparse]…[/noparse] if you want the literal text to render.
Mentions
Type @ followed by a username and a dropdown of matching members appears. Pick one, and that person gets pinged the moment your post lands, whether they're online or offline.
A handful of group mentions work too:
@gm— every GM and assistant GM in the game@players— every player in the game (excludes readers and applicants)@here— everyone who's looked at this topic recently@everyone— every member of the topic. Use this one sparingly, it can be overwhelming.
Each recipient's notification settings decide how they get pinged (in-app, push, email). Group mentions don't get past mutes: someone who's muted the topic still won't get the email, no matter how you tried to summon them.
Mentions outside of a game (in community forums, blogs, and DMs) work the same way for individual users. Group mentions, though, are game-scoped, so they simply won't resolve out there.
Quoting
Hit Quote on any post and its content flows right into your reply, already formatted with the author, a link back to the original, and the full text. From there it's just normal editor content, yours to shape however the moment calls for: trim it down to the single line you're really responding to, keep the whole thing, whatever serves your reply best.
Quick Reply quotes stay tight and simple: a single quote, no nesting, dropped neatly at the bottom of your draft. Perfect for fast back-and-forth. Full Editor quotes give you nested quoting for when you're weaving together a longer thread of replies, along with the full toolbar for anything else the post needs.
Light rules of the road:
- Try not to quote a whole post just to add a "+1." Your fellow players will skim right past it, and you'll end up burying whatever you actually wanted to say.
- Quoting an OOC block carries the OOC flag, so the meta-tone survives.
- Quoting a whisper or private block always respects the original audience. If you couldn't see it, you can't quote it, and if you could, the quoted excerpt stays visible only to that same audience.
Where the Quote button lives
Two places:
- On any post's hover-action bar, alongside Reply and Edit. This is the fastest path to quote.
- In the Full Editor's toolbar, where you can paste a post URL or pick from the topic's existing posts. Useful when you want to quote a post that's far up in the topic without scrolling back to find it.
Language tags
The Language dropdown in the editor lets you wrap text as spoken in a specific in-game language. The setting is sheet-driven: a reader can understand the wrapped text only if their currently-posting-as character has that language in their sheet's languages field.
When you post text in a language, the editor offers the languages your own character knows (drawn from your character sheet's languages field). Non-speakers don't see plaintext. They see obscured text indicating "something's being said, but not in a tongue you know."
A few practical notes:
- Languages live on the character sheet, not on the user. Different characters in the same game can know different languages; the editor picks up whichever character you're posting as.
- GMs see everything. GM-level access bypasses the comprehension check, regardless of which character (if any) the GM is posting as.
- Reading is computed at render time, not at post time. If a player's character later learns a new language, retroactive posts in that language become readable. ( It must be the same character; same player. Not the case if the player swaps to a different character mid-campaign, or someone picks up a character.)
- The list of known-by-someone languages is union-derived for the language-picker dropdown. You'll see every language any of the game's characters speaks, even if your character can't speak it. Picking a language your character doesn't speak is allowed (e.g., for narration of overheard NPC speech) but unusual.
[GM]
Languages are derived from attached character sheets automatically, but the sheet template needs a languages field that the parser recognizes. Most major-system templates have this configured. If a player's expected language list is empty in the picker, check their sheet's data extraction.
Adding languages no character knows yet. Open the game's Characters tab and find the Languages panel (GM-only). It summarizes every language known across the attached character sheets — with a per-character breakdown — and lets you curate an Additional GM languages list. Languages you add there appear in your language picker even when no player character speaks them yet, which is handy for secret tongues, NPC languages, or cultures you haven't introduced. Quick-add buttons let you promote a sheet-derived language into the curated list in one click.
These curated languages only widen the GM's writing options — they don't change who can read a tagged passage. Comprehension is still decided per-reader by their own sheet, so a passage you write in a GM-added language stays obscured to players until their character actually learns it.
Sheet-field placeholders
If you've linked a character sheet to the game, the editor's Sheet field button (📋) opens a picker that lets you drop live values from the sheet straight into your post. The button appears once you're posting as a character — if you don't see it, pick your character on the composer's Character tab first, then return to the Editor tab. This includes current HP, AC, spell slots, or the dagger you remembered to pick up two sessions ago. Browse or search; each row shows the current value so you know what you're inserting.
When you submit, every chip bakes in its value at that moment. Later edits to the sheet won't reach back and rewrite your old narration, so your retelling of that bloody fight in the goblin warren stays true to the HP total you actually had at the time. If you want to pull fresh numbers mid-edit, the Refresh button walks the whole post and updates every chip in a single pass.
You can also set a value from right inside the picker. Type your new HP after taking a hit, press Enter, and the chip uses the updated number. The sheet write itself happens just once, on submit, so if you bail on the post the sheet stays exactly as it was.
[GM]
As a GM or assistant GM, you can edit any linked sheet's fields from the picker, not only your own characters'. It's the same interface throughout, and it always respects whatever sheet-edit permissions you actually hold. This is wonderful for the "the magic item attaches to the rogue mid-narration" moment: open the picker, set the new slot, insert the chip, and post.
The Post Editor guide covers the picker's mechanics in detail. This includes keyboard shortcuts, field search, and value-set syntax.
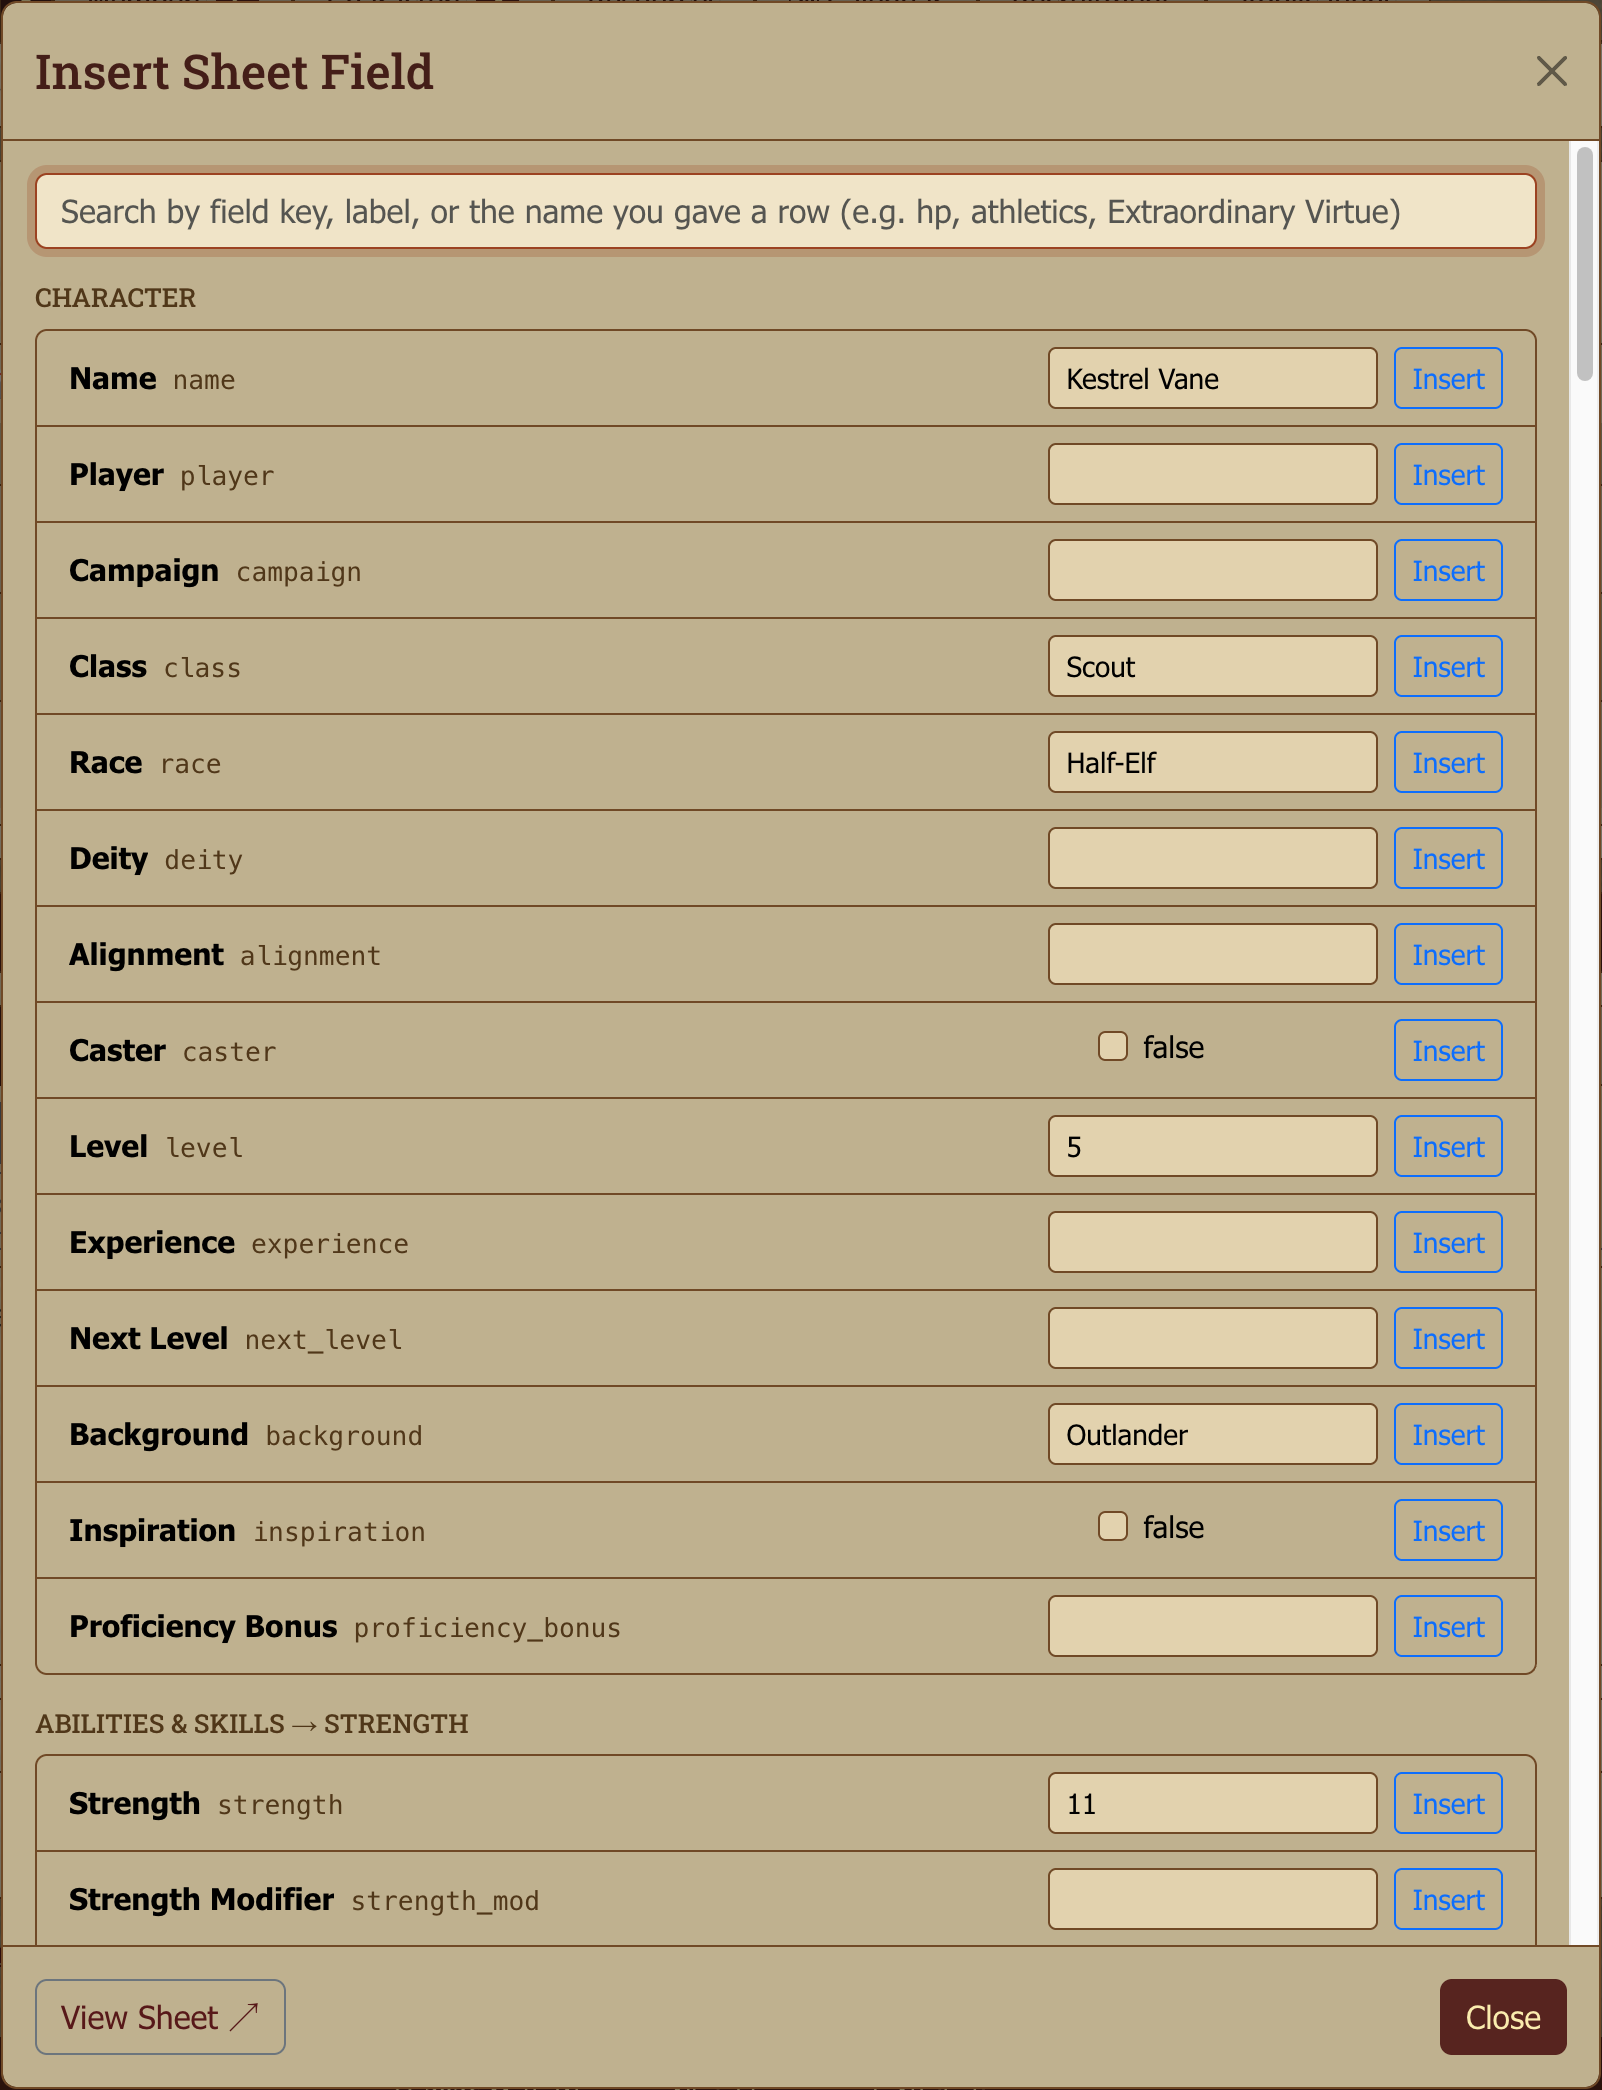
Field picker controls
Getting to the picker:
- Choose your character. On the composer's Character tab, pick the character you're posting as. If a primary character is already selected you can skip this — the Character tab is for choosing one, or for posting as a secondary character.
- Return to the Editor tab. The composer's tabs swap the panel, so the toolbar isn't on screen while the Character tab is open.
- Click the 📋 Sheet field button in the toolbar's second row. It's an icon, not a text label, and it only appears when you're posting as a character.
Once the picker is open:
- Type to filter fields by name; the list narrows as you type.
- Rows you name yourself — on templates with freeform, self-labeled rows, search by the name you typed rather than the underlying field key. This covers the Generic sheet's attributes (typing
Extraordinary Virtuefinds the attribute you labeled that way instead of making you remember it's stored asattr_1_value), a resource track you've renamed, an equipment item (search the item's name to find its quantity, weight, or notes), and the character note blocks (Description, Personality, Character Traits, … — findable by those names, or by whatever you renamed them to). - Arrow keys navigate the suggestion list; Enter inserts the selected field.
- Each row shows the current value of the field, which is what will be shown in the chip when you submit your post.
- The value editor at the bottom lets you type a new value before inserting. Submitting the post commits both the chip and the sheet write in one transaction; cancelling leaves the sheet untouched.
- The Refresh action checks every chip in the post and pulls current values in a single pass. This is useful when a sheet's been updated since you started writing.

Inserting your statblock
Many sheet templates have a Generate Statblock button that builds a short summary of your character — name, level, hit points, defences, weapons — and stores it on the sheet. In the field picker that summary appears like any other field, marked with a Statblock badge, with a Preview link so you can check it's current before inserting.
It behaves differently from an ordinary field, because it's a whole block of formatted text rather than a single value:
- In a post, it's inserted as ordinary formatted text. You can trim it, reorder it, or delete the parts you don't want, exactly as if you'd typed it — and it stays as you left it, showing the numbers as they were when you posted.
- In your postbit, statblock, or content template, it stays linked to your sheet. Every time you post, it's rebuilt from your current numbers, so the statblock beside your posts keeps up with your character without you editing the template again.
The picker tells you which of the two you'll get before you click Insert.
If the field looks empty, the statblock hasn't been generated yet — open your character sheet, click Generate Statblock, and save. Re-generating it overwrites whatever was there before, so if you've hand-edited your statblock on the sheet, that edit is replaced.
Images and attachments
The editor supports inline images and file attachments:
- Image upload — click the image toolbar button, or drag-and-drop into the editor. Files upload to S3 and embed inline.
- Image URL — paste an external image URL to embed without uploading.
- Reuse — the third tab of the Insert dialog lists images you've used before, so a recurring NPC portrait or map doesn't need uploading again. It covers everything: images you've uploaded here and images carried over from the old forums, in one list — your most recent uploads first, then your older library. When you're posting inside a game you can narrow it to that game's files.
- File attachments — attach files (PDFs, character sheet exports, maps, anything) to the post. Attachments appear below the post body with download links.
Removing an attachment
The attachment list sits below the editor, with a red ✕ on each file. What that ✕ does depends on where the file came from:
- A file you just uploaded in this session is removed straight away — it was never attached to anything yet.
- A file already attached to the post you're editing is removed when you save. Until then it's only marked for removal, so hitting Cancel leaves the post exactly as it was.
The list also appears in Markdown, HTML, and BBCode mode, not just Rich Text — so you can see and remove a post's attachments whichever mode you write in. Adding new files still needs the Rich Text toolbar.
Reusing an image is always cheaper than uploading it again — and images carried over from the old forums don't count toward your storage quota at all.
If you upload a file that turns out to be identical to one you already have, the editor says so and offers to use your existing copy instead, so the same picture doesn't take up your quota twice. You can still choose Keep both. Any copies you've already accumulated are listed under Account Settings → Storage.
Upload limits depend on supporter status — see Account Settings for tier details. Free accounts have generous limits for normal use; supporters get more headroom for image-heavy posts and large attachments.
Large images and maps
Images you link from another site (Imgur, Discord and the like) are copied to Myth-Weavers, so they keep working if the original host deletes them. Very large images are shown in posts at a smaller reading size so topics load quickly, and the full-size original is kept alongside.
To see the full-size version, click the image: the pointer turns into a magnifying glass over any image that has one. The original opens in a new tab, where you can zoom in to read map labels and fine detail. If you've wrapped the image in a link yourself, clicking follows your link instead.
Image bubble menu
Click any embedded image and a bubble menu appears with float (left, right, center), resize handles, alt-text editor, and link-wrap toggle. Alt text isn't optional cosmetics, it's how a player using a screen reader experiences your post.
Under the hood: where do uploads live?
Images and attachments upload to S3 storage at static.myth-weavers.com. The post stores a reference to the upload, not the file itself, so re-renders are cheap. Deleting a post doesn't immediately delete the underlying file. A cleanup process handles orphaned uploads on a schedule.
Tables
Insert a table from the toolbar (Rich Text mode). Click into any cell to surface the table bubble menu:
- Add or remove rows and columns
- Toggle zebra striping (alternating row backgrounds)
- Resize columns by dragging the column borders
- Merge or split cells
Tables are useful for initiative trackers, inventory lists, character sheet excerpts, comparison stats, or anything that wants structured rows.
Where the table sits — Position
Table ▸ Properties… in the bubble menu has a Position control with five choices:
| Choice | What it does |
|---|---|
| Left / Center / Right | Places the table on its own line, aligned that way. Text carries on below it. |
| Wrap left / Wrap right | Floats the table to that side, and the text that follows flows up beside it. |
Only one applies at a time — picking any option clears the others.
"My table has text wrapping beside it and I never asked for it"
That's almost certainly an imported table. The old site marked tables in a way that floats them, and the import preserved it faithfully, so the wrapping came across with your post. It was never a setting you chose — which is why it was hard to find and, until now, impossible to switch off.
Open Table ▸ Properties… and you'll see Position already showing Wrap left or Wrap right. Pick Left instead and the table drops onto its own line with the text below it.
If you previously worked around this by pressing Enter repeatedly to push text clear of the table, delete those empty paragraphs afterwards — they were sized against the float and will otherwise leave a gap, especially on a phone, where the float is switched off anyway.
For wrapping text around something that isn't a table — an image, a block of
flavour text, a portrait — use the float block instead (the [floatleft] /
[floatright] containers), which gives you width, margin and border controls of
its own. Table Position is for the table itself.
Drafts
The editor auto-saves your drafts to your browser's local storage. Close the tab by accident, navigate away mid-post, lose power to the whole house: when you come back to the editor, your draft is sitting right there waiting. A "Draft saved" indicator confirms each save, which usually happens every few seconds as you type.
When you return, restoring the draft is offered to you automatically, and you can always discard it instead if you'd rather start with a clean page.
Under the hood: drafts are local-only
Drafts live in your browser's localStorage, not on the server, which has a few consequences worth knowing:
- They're private to the device and browser you're using.
- Clearing browser data wipes them.
- You can't pick up a draft on your phone that you started on your laptop.
Server-side draft sync, so your drafts can follow you from device to device, is on the post-cutover wishlist but not yet implemented.
Style guide
The Style Guide toolbar button opens a quick-reference modal covering the common formatting patterns: IC post conventions, stat block layouts, letter prop styles, and the rest. It's the thing to reach for when you can't quite recall the exact syntax.
Next steps
- Dice Rolling — the dice system in detail.
- Forums and Posting — the posting orientation: IC/OOC, character selectors, deadlines, the game-page tabs.
- Characters, Resources, and Maps — linking sheets so the sheet-field picker has something to read from.